Create your escape room online
ROOM ESCAPE MAKER Tutorial
Hello,
This tutorial is the summary of two videos .
If you're new to REM, it is recommended to watch them for more details.
The logic of escape games
One of the reasons why escape rooms online work well is because they are fun and easy to set up. They are usually created in a procedural way, always with conditions and simple instructions, mostly just to hide and show things. For example, if you interact with a closet, the interior of the closet may be displayed. If you interact with a key, it will disappear and then appear in your inventory. If you use this key on a closed container, an open version of this container will be displayed and the key will be removed from your inventory.
New project and game parameters
Once you've created an account and validated your email, you're ready to create games. Just choose the name that will appear in the URL and you can start editing your project. Click on 'Edit Game'.
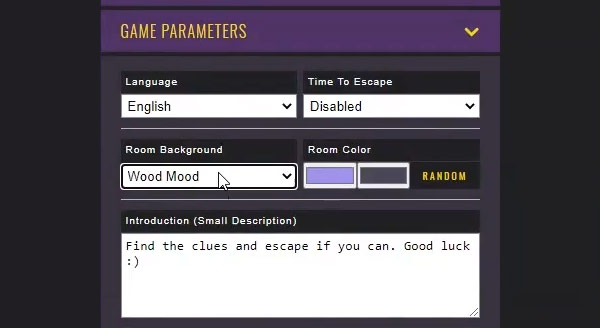
In the editor, one of the main tabs in called 'Game Parameters'. There you can set:
- The language, in case you decide to add texts in languages other than English
- A time needed for players to escape (if it's a small game, for example, it doesn't need to have to be an hour)
- An image for the background of the room
- Wall and floor colors
- An introduction text, to describe your game or give context to players
Interactions
By default, a new game project will display a door and its knob. If you click on the 'Preview' button, above the game area, you can already see a glimpse of a game in another tab. Clicking on the door in the preview mode will display a message saying it is locked.
Back in the editing mode, when clicking on this door or its knob, you can see a panel with its settings. It says 'On click', 'Show small message' and the message is 'The door is locked'. This is one of the possible interactions, the one you just tested.
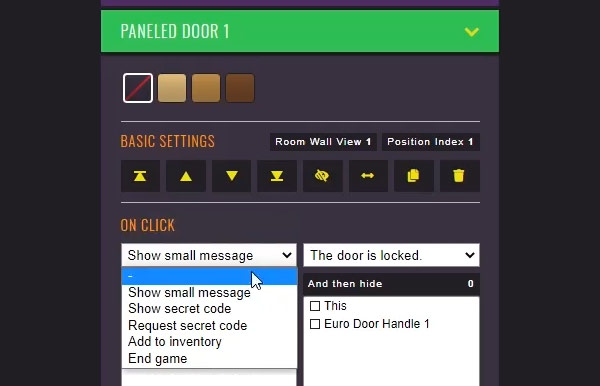
The possible interactions are:
- Show small message, for additional context but also to guide the player
- Reveal secret code, to reveal a code or a password
- Request secret code, to have the player enter a code in order for something to happen, like a padlock to be open
- Add to inventory, to add an object found by the player to their inventory, like a key or a screwdriver
- End game, to indicate that the player has escaped
Besides these, every interaction is based in showing and hiding graphics. For example, if you have a closed container, you can make that 'On click', the open version of this container will be shown and the closed version will be hidden. This will give the illusion of the container being open. If you 'Request secret code' first, then the open version will only appear once the players enters the required code.
Layering and placing graphics
Before getting more into interactions, it is important to have a plan and place a few graphics. To add a graphic, go to the tab titled 'Available Graphics'. Every graphic available for your game will be there. You just have to click on one and it will automatically be added to your room.
Your room can have up to 4 walls. You have to imagine each wall view as a canvas. You add graphics as layers, one over each other, and each graphic will then have a position index, that you can find in its settings.
For example, if you add a cushion, then a chair, you will see that the chair will be in front of the cushion. That’s usually not what you want. However, do not focus on the perfect placement at first. You just need to be able to select the items to set interactions. Moving and rearranging graphics can always be done later. To rearrange them, use the first black buttons with arrows up or down in their basic settings.
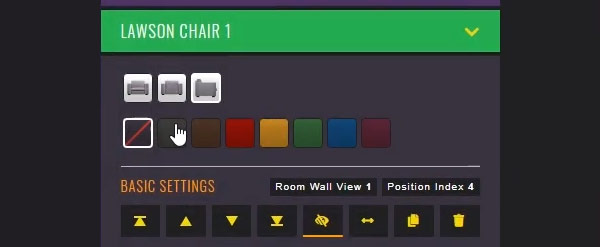
Other buttons in this line include:
- Toggle visibility when game starts. This defines if the item will be available or not in the beginning of the game. For example, an open version of a safe should probably be invisible at first.
- Flip the item and have it mirrored.
- Duplicate the item, to place a similar graphic in your game without having to search for it.
- Delete the item, in case you decide you don’t want it anymore.
Some graphics exist in different versions. The specific buttons for this will appear just above it’s basic settings. For instance, a chair can be seen from the back, from the side, and be black, brown, red, etc.
The player's inventory
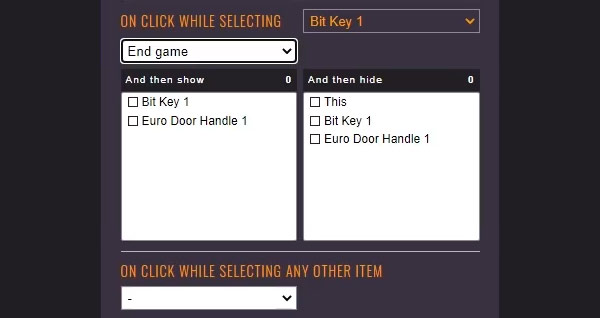
When you set an interaction on an item and makes it 'Add (something) to inventory', it usually is 'This', the item itself. For example, if the player clicks on a key, the key itself is added to their inventory. To make the game more realistic, be sure to check 'And then hide' also 'This'. It causes the key to disappear from the room while appearing in the inventory.
To allow players to use items from their inventory, you need to set interactions on the target item. If you want a key to be used on a door, then you need to select the door, and set that 'On click while selecting' the 'Key', something should happen. You can then set the same kind of instructions as if it was a simple click. For example, if the player escapes after using a key on a door, you simply need to select 'End game'.
Good practices and publishing
Don't forget to save and test the game multiple times to make sure your project is going as planned. Once all your main interactions are set, it's time to place everything in its final position and make sure items that should not appear when the game starts are correctly hidden. You can also add a few extra decorations at this moment to fill in the gaps and trick players.
When you’re done testing the game, you can leave the editor and send your game to review. After that, you will be able to publish the game and share it with everyone you want to.
Next steps
As you create games, the more you allow the process to get a bit complicated, the more you'll notice how powerful the editor really is. If you like escape rooms, I highly recommend you not to stop creating after your first game gets published. Also, don't forget to gather some feedback from players. This will also help you get more creative.
If you have specific questions, want to share your experience or suggestions about your games, feel free to send an emailsupport (at) roomescapemaker (dot) com at any time. I will be glad to exchange with you. My main goal by creating the platform was just for everyone to have fun with escape rooms.
--Andre